Propagating Geraniums

Every year I have to buy more Geraniums because at some point the temperature gets down to about -10C and kills them.

This year I have decided to propagate some geraniums by planting  cuttings at the house on the coast which has a mild climate.

I simply cut off the main stems from the parent plants and then protected the originals with garden fleece so that they might survive the winter.  I made cuttings about 15cm long, making the cut just below a node.  I left one healthy leaf on each cutting. I didn’t use any cutting hormones. (because I had forgotten to buy any). I used a plastic tray module.I did  this on the 28th December 2011. They were left in the open air. The climate is mild and rarely goes below 10C.

Blog post continued on 6th March 2013.

The picture below shows the overwintering geraniums from last year and new ones being propagated. Last year’s ones were a big success.
Propagating geraniums is easy.  The most important thing to do is spray them every 3 weeks to stop the stem boring caterpillars.

Geraniums

Easy way to prepare olives

Olives in Salt

I have had many attempts at preserving and preparing olives but none of them worked very well until I found this simple technique.

When olives are prepared by any method we are basically doing two things. 1. Stopping the olives rotting. 2. Getting rid of some of the bitterness from the olives.

My technique is very easy. Just pick some black olives (the later you pick them the more oil content they have) then put them in a container with sea salt. It is best if the container is totally open at the top and it is good if the sun shines on them to evaporate some of the liquid. Mix them around every few days with a stick or with your hands. At first a lot of liquid collects at the bottom of the container. You can pour this off.

The salt draws the liquid and most of the bitterness from the olives. Eventually after about 6 weeks the olives become totally dry.

Separate them from the salt with a garden riddle or any other type of sieve. After this you have dessicated olives which you can store for as long as you like.

Every couple of days put a handful of olives in a glass jar of water in the kitchen. It takes anything between 8 and 48 hours for them to re-hydrate.  Put a handful of the re-hydrated olives on salads, pizzas or anything you want. If you put them in a bowl and them put a few drops of olive oil over them they taste and look  like the Greek olives I used to buy when I lived in Finsbury Park London.


Solar Drier made from chimney tube

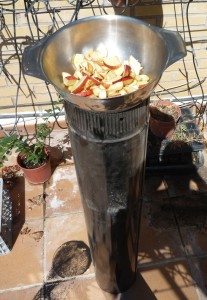
I had spend a lot of time looking at very complex home-made solar food driers on internet. Most of them consist of a black area which heats up the air. The hot air dry then flows over the food to extract the moisture.

I realised that a very quick free version can be achieved just using a back tube and a metal colander. The air heats up in the tube and then passes through the holes in the colander.

This drier  can dry out a couple of apples in about 6 hours. It is a bit unstable and can easilly be knocked over. A good variation would be to use several black tubes taped together with a big cardboard box on top.

Dried Pears

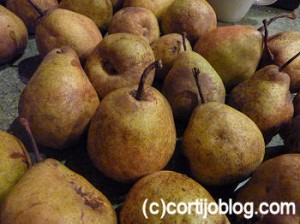
Winter Pears

We have a large winter pear tree below the vegetable garden and every year there is a big crop of pears. (we probably have such a big crop because the pear tree is below the garden and the tree’s roots take in a lot of the nutrients that have seeped through from the garden) .

Every year until this year we have not eaten many of the Winter pears because at the end of the Autumn they are still very hard and they don’t seem to store well. This year the whole crop was lying on the ground below the tree  in mid December and they were starting to go ripen. Many of them were already rotten. In order to make some use of them I decided to dry them using our drying machine.

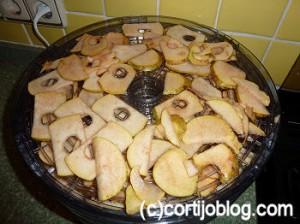
Slced Pears in the drying machine

A few months ago I bought a 250 watt Arizona food dehydrator on the internet. There are 5 layers of plastic with many holes in and the food is loaded on each layer until it is full.

It would be possible to slice the pears by hand but I put them through the slicing attachment on Sarah’s Magimix Food processor to save time.  The picture on the left shows the fully loaded drying machine ready for use.

Dried pears in the drying machne

The foto on the left shows the dehydrated pears after about 8 hour in the machine. They are not totally dessicated and they are leathery rather than brittle. The idea is to add them to our mueseli.

They are really tasty and they could be eaten as a heathy snack. I imagine that they would be perfect for children.

To find out the cost of the electricty consumed I used a consumption calculator here http://crazycalculations.com/electrical_consumption/index.php According to the calculator the drying cost me 38 euro cents. (I was at the coastal house where we use Iberdrola who charge 19 cents per Kwh)

Dried Pears after they have been dried.

The pear drying experiment was a big success. The dried pears are delicious and this year will be the first year that we have been able to use many of the winter pears.

I had previously tried storing the pears but they tend to go brown which makes them emit ethylene gas which makes all of them go off very quickly.

The Goji Berry Project

In August 2010 I bought some dried Goji berries. At that time they were being touted as the ultimate super food, capable of lowering cholesterol, lowering blood pressure, cleaning the blood and a whole list of other health benefits which it seemed would lead to almost everlasting life.  I checked them out on many websites and their growing conditions matched the climate of our cortijo. The can put up with cold down to -15C and also they don’t mind strong sun and drought conditions, I realised that  this is the sort of tough as old boots plants we need in the sometimes harsh environment that we have at the cortijo. After some more research I decided to grow some.

The first step was to soak the seeds in water for a day and then break the berries up with my fingers. Then the seeds were put in a kitchen sieve and put under a jet of water. It was easy to separate then from the pulp. I then spread the seeds onto the top of some potting compost in a flowerpot.  When some of the seedlings were about 1cm high I transplanted them to  plastic growing modules.

Some of them died but I kept replacing them with other ones from the flowerpot until I had about 50 viable plants.

Most of the plants had reached about 8cm by October. We then took them down to the coast which has a mild climate with no frost. During the winter they did not lose their leaves but they seemed to be in a dormant state and did not grow much. Supposedly the dormant state was influenced by the hours of daylight.

We started planting the Goji berries into the ground on the 2nd of May 2011. The holes were about 30cm deep and we filled them with a mixture of manure, bags of garden soil form the garden centre and a little fish blood and bone mixture.


Peter designed a  system to protect the young plants from rabbits or other unwanted predators. Peter made tubes out of chicken wire which were held in place by bamboo sticks. The advantage of this system is that the wire mesh can be easily pushed up to enable weeding.


Goji berry just after being planted

Although the plants had been in a mild climate on the coast with a fair amount of sun they were only about 12cm high when we planted them.

They were mulched with composted almond shells.


Cathy Goji BerryGoji Berry Grown on the Coast The photo below is a plant that I gave to a friend from the original batch who lives on the coast near Malaga. She kept the pot in a garden and watered it well. This is much better than any of my plants. This just goes to show that the environment is very important.